Continuing on where we left off during our overview of the Security and Compliance center, we return to explore the capabilities contained within the default alerting structure, and the flow of how to create custom alerts. Let’s dive right in.
Default Alert Rules (Policies)
The alerting structure in both the security center and cloud app security are broken down into High, Medium, and Low severity, and the baseline categories they are organized into are ‘Data loss prevention’, ‘Threat Management’, ‘Data governance’, ‘Permissions’, ‘Mail Flow’, and ‘Others’. The types of alerting policies that can be created in both environments are similar, with the O365 Security & Compliance center focusing in on activities inside the email environment, and Cloud App Security acting more as a CASB solution, though at times the water does get muddy around “what should I do in which console”. To that, my answer is if you have Cloud App Security, use that for everything you can.
It is worth noting that these default policies can and should be edited based upon your organizations risk management strategy and threat intelligence findings. For example, if through analysis of multiple internal business email compromises you determine that the attacker(s) most often start off their workflow by adding a new mail forwarding or redirect rule, you might make the decision to change the rule involving the creation of such from a ‘Low’ severity to a ‘High’ severity. You should also take into consideration if creating these types of rules is common in your environment before doing so, to limit the amount of false positives generated. More on these types of exercises later. Below is the list of the policies that you get out of the box, and they give a good view into what types of policies can be created.
Elevation of Exchange admin privilege
Severity: Low. Category: Permissions
Malware campaign detected and blocked
Severity: Low. Category: Threat Management
Unusual volume of file deletion
Severity: Medium. Category: Data Governance
Unusual external user file activity
Severity: High. Category: Data Governance
eDiscovery search started or exported
Severity: Medium. Category: Threat Management.
Malware campaign detected in SharePoint and OneDrive
Severity: High. Category: Threat Management.
Creation of forwarding/redirect rule
Severity: Low. Category: Threat Management.
Unusual increase in email reported as phish
Severity: High. Category: Threat Management.
Unusual volume of external file sharing
Severity: Medium. Category: Data Governance.
Messages have been delayed
Severity: High. Category: Mail Flow.
Malware campaign detected after delivery
Severity: High. Category: Threat Management.
Creating New Alert Rules (Policies)
Microsoft has made creating alert policies very simple inside of their console, breaking the steps down into four categories; naming the alert, creating the alert settings, setting the recipients of the alert, and finally reviewing the settings before confirming. That being said, this is Microsoft, not Splunk, so don’t expect a great deal of in depth customization or granularity in your policies. The Microsoft focus is on usability and lowering the bar to entry, so while you can’t go as in depth as you can in a system such as Splunk (I know, we are talking about two very different toolsets here) you don’t need the in depth technical expertise that you would with some other tools just to get a basic alerting structure in place.
There are various alert activity settings that can be monitored in our policies, however compared with Cloud App Security, it really is the skeleton of what Microsoft’s capabilities really are. Below are the categories that you can select from, and each category has a drop down menu of specific items. Most of which focus on data governance. I won’t list them all here, as there are far too many for me to even remotely care to type out by hand.
Categories For New Alert Creation:
Common User Activities
Such as detecting malware in a file, sharing a file or folder, or granting of mailbox permissions. You can create rules under this category focused around monitoring specific SharePoint archives or specific users sharing out files externally. There’s not a whole lot extra that needs to be done with this section, a the default policies take care of most of the grunt work.
File and Folder Activities
Such as accessing a file, deleting a file, or copying a file.
Files Sharing Activities
As the name states, deals with the sharing of files from SharePoint.
Synchronization Events
Such as allowing a computer to sync files, downloading files to a computer, or uploading documents.
Site Administration Activities
Monitor how your sites are configured and modified.
Recommendations for new rules
As you can see, the rule creation here is pretty bare bones and leaves a lot to be desired. But hey, Microsoft wants you to upgrade to their fancy new Cloud App Security solution and shell out some more money to get those extra security monitoring features. Honestly though, it’s worth it. And this is coming from someone who is anti - Microsoft. We’ll delve into Cloud App Security more in the next post, but for now lets go through some of the low hanging fruit we can target inside this portal.
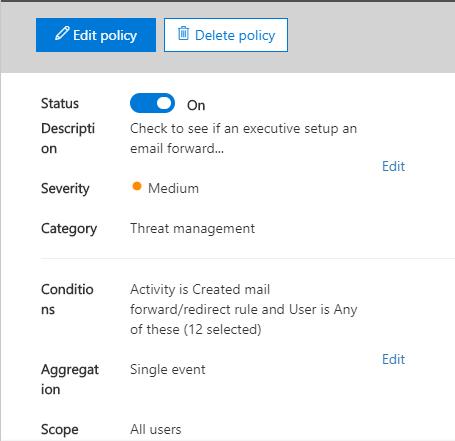
1. Create a rule around Executive Email Forwarding.
This means that the security team will be alerted anytime someone in Senior Management, or who is a department leader has their email account modified to forward or redirect their mail to another email account. You can expand this out to meet the needs of your environment.
2. Create a rule around receiving Similar Domain Emails.
Here I recommend using a tool to enumerate registered and unregistered domains related to your company (dnstwist works amazing, link below). This will alert you anytime an employee receives an email from a domain that looks similar to your company’s (often attackers do this to get around anti-spoof rules and try and trick your employees). For example, if my company’s domain was @CyberKittenz.com I would want to know if my folks received an email from @CyberKiittenz.com.
3. Monitor Restricted Users
This isn’t a rule you can create, but by default (I still haven’t found where I can edit the settings for this) O365 will block user accounts that have been identified as sending too many messages that get marked as spam/bulk. I’d keep an eye on this section, as it’s a good bet that if a user gets blocked for this, they have been compromised. You can find this under Threat Management –> Review –> Restricted Users.

That’s all I have for you on the Security and Compliance center. There are a boat load of more features inside Cloud App Security, and I have far more rule recommendations that I will get into under that section. Most of which revolve around detecting when your users are the target of identity compromise and when they have actually been compromised. I’ll also be writing up another article similar to my ‘Email Compromise Analysis’ writeup focusing on triaging user compromise from the custom rule recommendations I’ll lay out.
Dnstwist tool - https://github.com/elceef/dnstwist